Friday, June 29, 2012

Flannel Friday-I Know a Wee Piggy

I Know a Wee Piggy by Kim Norman came through our new book shelves this week and I knew it would make a great flannelboard.  The rhyme reminds me of I Know an Old Lady Who Swallowed a Fly, but the cumulative colors are similar to Dog's Colorful Day by Emma Dodd.


We start off with our wee piggy made out of pink felt.  The pattern was a Microsoft clip art pig increased to 11x17 and printed out.  The details are puffy paint.


The story starts with:
I know a wee piggy who wallowed in brown.
Upside down, he wallowed in brown.
"But brown is not for me," he said.
"I think I'll add a rinse of..."

Our wee piggy ends up with spots of brown, red, white, pink, yellow, black, green, gray, purple, and blue.


I Know a Wee Piggy would be a great addition to a story time on pigs, animals, colors, or fairs.

This week's Flannel Friday round-up is hosted by Andrea at Roving Fiddlehead Kidlit.

Thursday, June 28, 2012

Toddler Art

Today in our Toddler Art program we made stars to decorate our program room for the summer.  We registered 25 2 and 3 year olds.  I like to set up the program so the kids get to try a lot of different mediums.  The actual program took no more than 1 hour, but it does take some time to set up and prepare.  You will also need a place for the creations to dry undisturbed.

Every kid who registered got two star shapes.  We were able to purchase packs of 24 white cardboard stars from Oriental Trading.  They decorated one star to take home and one star to give to me to hang up.  We put out 6 different stations and kids could spend as much or as little time as they wanted at each.  All of our stations are on the floor and we put down a lot of paint tarps and brown roll paper to help contain the mess.

Station 1
Station 1 was watercolor paints.  If you have the option, you will want 8-10 sets for this size group.  I always add extra brushes so some of the kids can share.  The kids will spend the most time here.

Station 2
Station 2 was glitter glue.  Discount School Supply sells a 6-pack of Rainbow Glitter Glue that the small hands can easily squeeze.  The glitter glue lasts a long time so I am able to put out extra old bottles so more than 6 kids can work at a time.

Station 3
Station 3 was jumbo crayons.  I like to have something familiar for those kids who don't like new or messy things.  They are also great for the kids to practice writing their names on their creations.  We put these on giant brown roll paper, which allows little siblings to feel like they are crafting too.

Station 4
I was surprised by how popular this station was.  We used Star Stampers from Oriental Trading.  There are 24 pieces in this set so everybody had a chance to use them.  Since the stamp pads are included in the stamper, they didn't make near the mess that stamps and stamp pads normally do.

Station 5
Almost all kids like stickers.  I found a variety of star-shaped stickers, some in foam and some in packs of stickers.  For the sticker packs, I cut the star stickers into strips so one kid wouldn't take the whole sheet and go crazy.  As it was the kids stickered their creations, then themselves.

Station 6
At station 6 we used dabber markers from Discount School Supply.  If you haven't used them before, they are a lot of fun to use.  They make great dots in a variety of colors.

Below are some of our finished products.


I like to create one too for an example.


I love to run programs like this for young kids as they have a lot of benefits other than the obvious cool decorations.  Kids get to use their imagination to design their creations.  The glue, paint, markers, and stamps all make the kids use their fine motor skills, which increases their preparedness to write.

Tuesday, June 26, 2012

Rock Star Crafts

We took a little different take on the Dream Big Read! summer reading theme in planning some of our programs.  We looked at what kids would want to be or dream about.  Our first big program was Rock Star Crafts for ages 6-12. 

We bought design your own inflatable guitars and design your own guitar pick necklaces (no longer available) through Oriental Trading.  We raided our supply closets and found all of our Sharpie markers.  It also helps if you have some of the chisel tip Sharpies as they can color large sections on the guitars.  If you want to add "strings" after you color your guitar, metallic silver Sharpies are great for adding them.

The kids had a great time.  I was pleasantly surprised by how many boys came.  They also tended to spend more time designing their "perfect" guitars, complete with flames and other intricate designs.  I would definitely run this program again.

Tuesday, June 19, 2012

Flannel Friday-The Pigeon Loves Things that Go

Let me start off by saying that I love Mo Willems!  He is one of those authors where I automatically buy his books for the library, because they are always quality books.  Plus, I really love that he used to write for Sesame Street.

I am starting to get ready for some ideas together for fall and want to do an all-Pigeon story time.  The problem is that it needs to be adaptable to large groups of 2 year-olds, in addition to preschoolers.  Flannelboards are a great medium to bring these stories to life for the younger set.

I started off with the shortest Pigeon book currently checked in-The Pigeon Loves Things that Go.  The simple lines of Mo's illustrations allow it to be easily redrawn or traced.  In the parts below, I freehand drew the pictures with black crayon, then colored them in.  While you can find similar colors to the illustrations, they won't be exact.


What this book really has going for it, other than a cute and funny story, is the literacy component.  Many of Mo's illustrations have the word spelled out on the same page.  For example, next to the bus picture is the word "BUS".  I did something similar by pulling out a handful of velcro letters that I have with our story time stuff.


By having letters available after your programs, you are providing a place for kids to play with words.  It is one of those literacy skills that they need before they can read.  I wouldn't use the letters as part of the storytelling unless they were all on the same piece of paper/flannel (or I would need 8 hands to tell the story).  This just gives you another option to take your program to the next level.  I can also envision a magnetboard with words and pictures and kids have to match them together.

If you need a craft for your program, check out the Pigeon Presents! Himself! for how-to-draw instructions, a coloring page, and a door hanger.

Check out Shawn at Read, Rhyme, & Sing for this week's round-up.  For more information on Flannel Friday, check out the offical blog.

Monday, June 18, 2012

Star Wars Program

A Star Wars party is a great way to get boys into your library.  It is almost like Halloween as a significant portion of the kids (and adults) will come dressed in their best Star Wars gear.

The first thing that you should do if you are going to host a party is to contact the 501st Garrison to request an appearance at least 2-3 months before your event.  If you can get them, they are great.  While it didn't work out for them to come to our party, they have come to other locations in the past.

We ran 6 different stations in our meeting room.

Station 1
This was the most popular station.  Kids made their own light sabers out of posterboard, paper towel tubes, and supplies that we had out.  We followed the pattern on Disney Family except that we cut our pieces of posterboard in half.  This makes it easier for the kids to roll the posterboard into the light saber.  If you make these, you will want to go heavier on the red and green posterboard as those were the most popular colors.  Almost all of the yellow pieces were left to the last crafters.


Station 2
Here we made Yoda stick puppets.  We started with the idea on StarWars.com, but changed it around a bit to make it easier for kids to do in a short period.  We cut the body of Yoda out of cardstock so kids could glue the felt to the cardstock pattern.  The cardstock pattern was taped to a small popsicle stick.  All of the pieces were cut out ahead of time by one of our wonderful volunteers and were sorted into snack-sized baggies that we could pass out to the kids.  That way all of the supplies were in one bag for each kid.

Station 3
To make light saber keychains, you will need 1 pipe cleaner, one neon drinking straw, 1 lanyard keychain, 3 pony beads, and a Star Wars picture.  Fold the pipe cleaner in half through the keychain (you will want the keychain in the middle of the pipe cleaner).  Add the 3 pony beads over both halves of the pipe cleaner.  Then, add the straw piece (you will need to cut it down).  I twisted the ends of the pipe cleaner together so there weren't any pokey pieces sticking out.


Station 4
I found a Darth Vader that kids could fold on http://toy-a-day.blogspot.com, but the pattern is no longer available.


Stations 5 & 6
These 2 stations were our calmer stations.  We had a Yoda coloring sheet at one and a Star Wars word search at the other.

If I were doing this again, I would either stagger registration times or run multiple smaller parties.  We have also talked about running a Jedi Academy, where kids could still make the light saber, then go through a Jedi obstacle course.  We registered 30 6-12 year olds for our program in a meeting room that can hold 100 people.  It was too many in this format as many brought younger siblings and the parents had the siblings making the crafts too.  The other problem we encountered is that we made light sabers.  These are really cool and were the highlight of the program, but there was a lot of fake fighting afterwards.

Summer Reading Decorating

This year my library is participating in the Dream Big Read! summer reading program theme.  Our branch does not have a lot of display space so we work with untraditional surfaces to create our displays, such as windows, ceilings, etc.  I am also a big believer of the Rule of Seven when looking at summer reading displays.  (If you are unfamiliar with the Rule of Seven, it says that the average person needs to see a message 7 times in order for them to take action.)  The more times that we can put our information out there, the better the return in participants.

We do use as many of the Upstart promotional materials as we can, such as the vinyl banner over the front doors, the stand-up display by the table of reading logs, and the outdoor signs out in the gardens along the buildings.  Below are some of the different ideas that we came up with.

As people pull in the parking lot, they can see our giant front window.


The font is similar to the Uncle Stinky font that is the official font for this theme.  The multicolor stars are approximately 8x8.  The backside of the stars that faces the lobby are covered in glitter.

As you walk in the lobby, there are 3-D cardstock stars hanging from the ceiling that my coworker made.  She found tacky spray adhesive that made it really easy to glitter the stars.


Our 2 service desks are covered by multicolored stars from Lakeshore Learning.


Below is our summer reading table.  I like having at least some of the information out on the floor because we have a lot of customers who like to pick up the forms without talking to anyone.  Plus, we have a very busy reference desk and people don't have to stand in line to get the information.  We do have staff available to answer questions and we do have a stack of forms behind the reference desk.  I am also a big advocate of asking people in line if they have picked up their forms.  (You will get a lot of blank looks.)  This gives me the chance to personally explain the program and pass out materials.  A lot of people don't "get" summer reading programs.  They think that since they are reading books, they are doing summer reading and that is what the program is.


Our teen librarian used the Own the Night theme with a Hunger Games twist.  When we decorated the window near our teen area, we kept the Hunger Games theme by using the font, the mockingjay, and the arrrows.


Throughout the library, we hung stars on the endcaps.  They give the basic information, such as ages and dates, then direct people to the reference desk.  What is great about these is that they allow you to put them in places you don't normally decorate.  Everybody can see that there is something going on if they walk in the children's room, but how about the nonfiction area?  We hang these on endcaps in nonfiction, reference, and the adult areas.


Finally, if you have missed all of the other information about summer reading, there is a sign attached to the gates as you head out the door.


The sign asks if you picked up your summer reading log, tells you it is free for all ages, then directs you to the reference desk to pick one up. 
Have a great summer!

Thursday, June 14, 2012

Flannel Friday-The Airplane Song

One of the things that we do at our library for toddlers is to have a dance party.  This is a separate program from story time that we typically hold for 2-4 year olds.  One benefit of this type of program is that you can have more participants than your typical story time if you have a good sound system (we run our ipod through our meeting room speakers).

Our dance parties last approximately 30 minutes of back-to-back songs.  We pull in the favorite songs from story time and add others.  There are a lot of great kids' action songs out there.  If you are looking to do something similar, start by checking out songs by Jim Gill, The Wiggles, Laurie Berkner, and Greg and Steve.

The Airplane Song by Laurie Berkner (on Whaddaya Think of That?) is a good addition to any action-based program.  Kids get to fly like airplanes, which they love, then do other actions, such as jumping.  These are great activities to work on toddlers' motor skills.  Since I like to use props when I can, I came up with envelope puppet airplanes for the kids to use and take home.


To make your own envelope puppet airplane, you will need half of a sealed envelope and a clip art or die cut airplane.  I found my airplane through the Microsoft clip art in Publisher.  Glue or tape your airplane onto the envelope to make your puppet.

Sarah at Read It Again! is hosting this week's Flannel Friday.  For more information about Flannel Friday, check out the Flannel Friday blog.

Thursday, June 7, 2012

Flannel Friday-100 Animals

I think of this rhyme as the "ultimate" in participation flannelboard rhymes.


100 Animals
I went to the zoo and what did I see?
100 animals looking at me.
There were 10 tall giraffes eating from the trees,
10 silly monkeys scratching on their kneews.
10 sleepy snakes lying in the sun,
10 elephants munching on peanuts one by one.
10 leaping tigers performing in shows,
10 pink flamingos standing on their toes.
10 grouchy bears trying to get some sleep,
10 happy hippos in the water deep.
10 roaring lions walking two by two,
10 galloping zebras...
All living at the zoo!


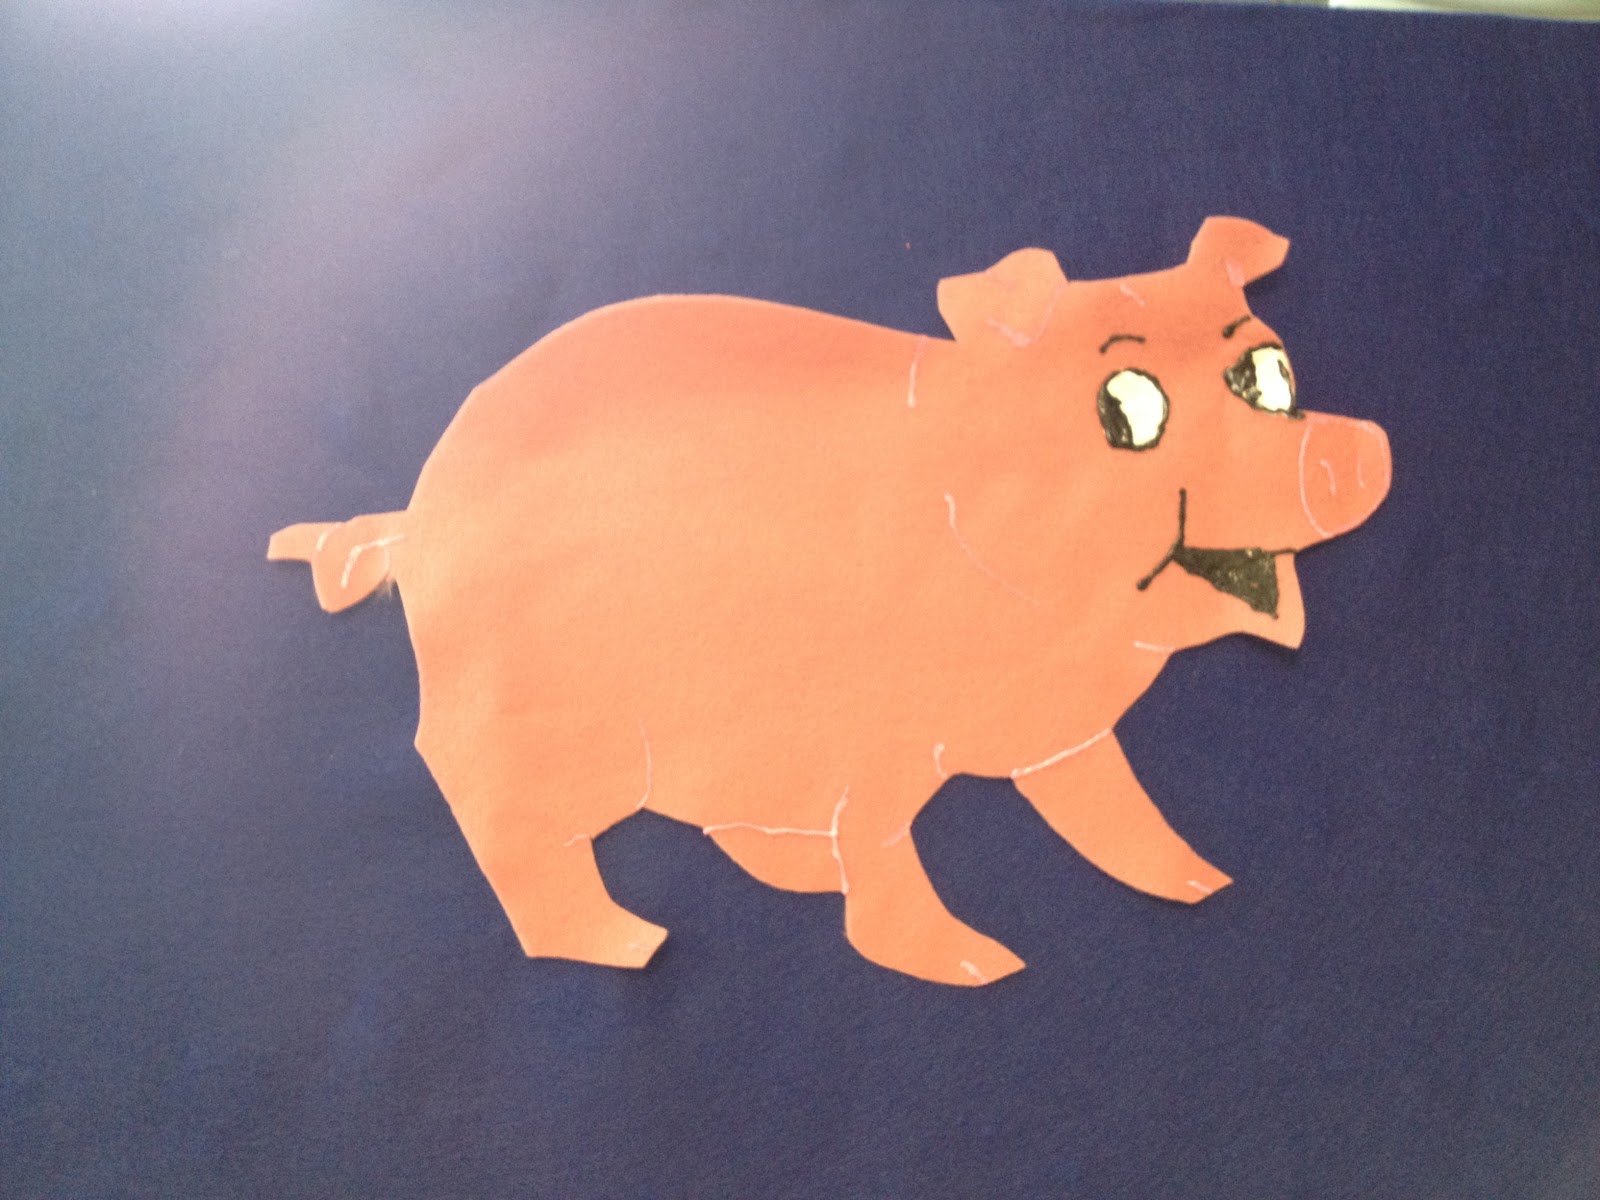
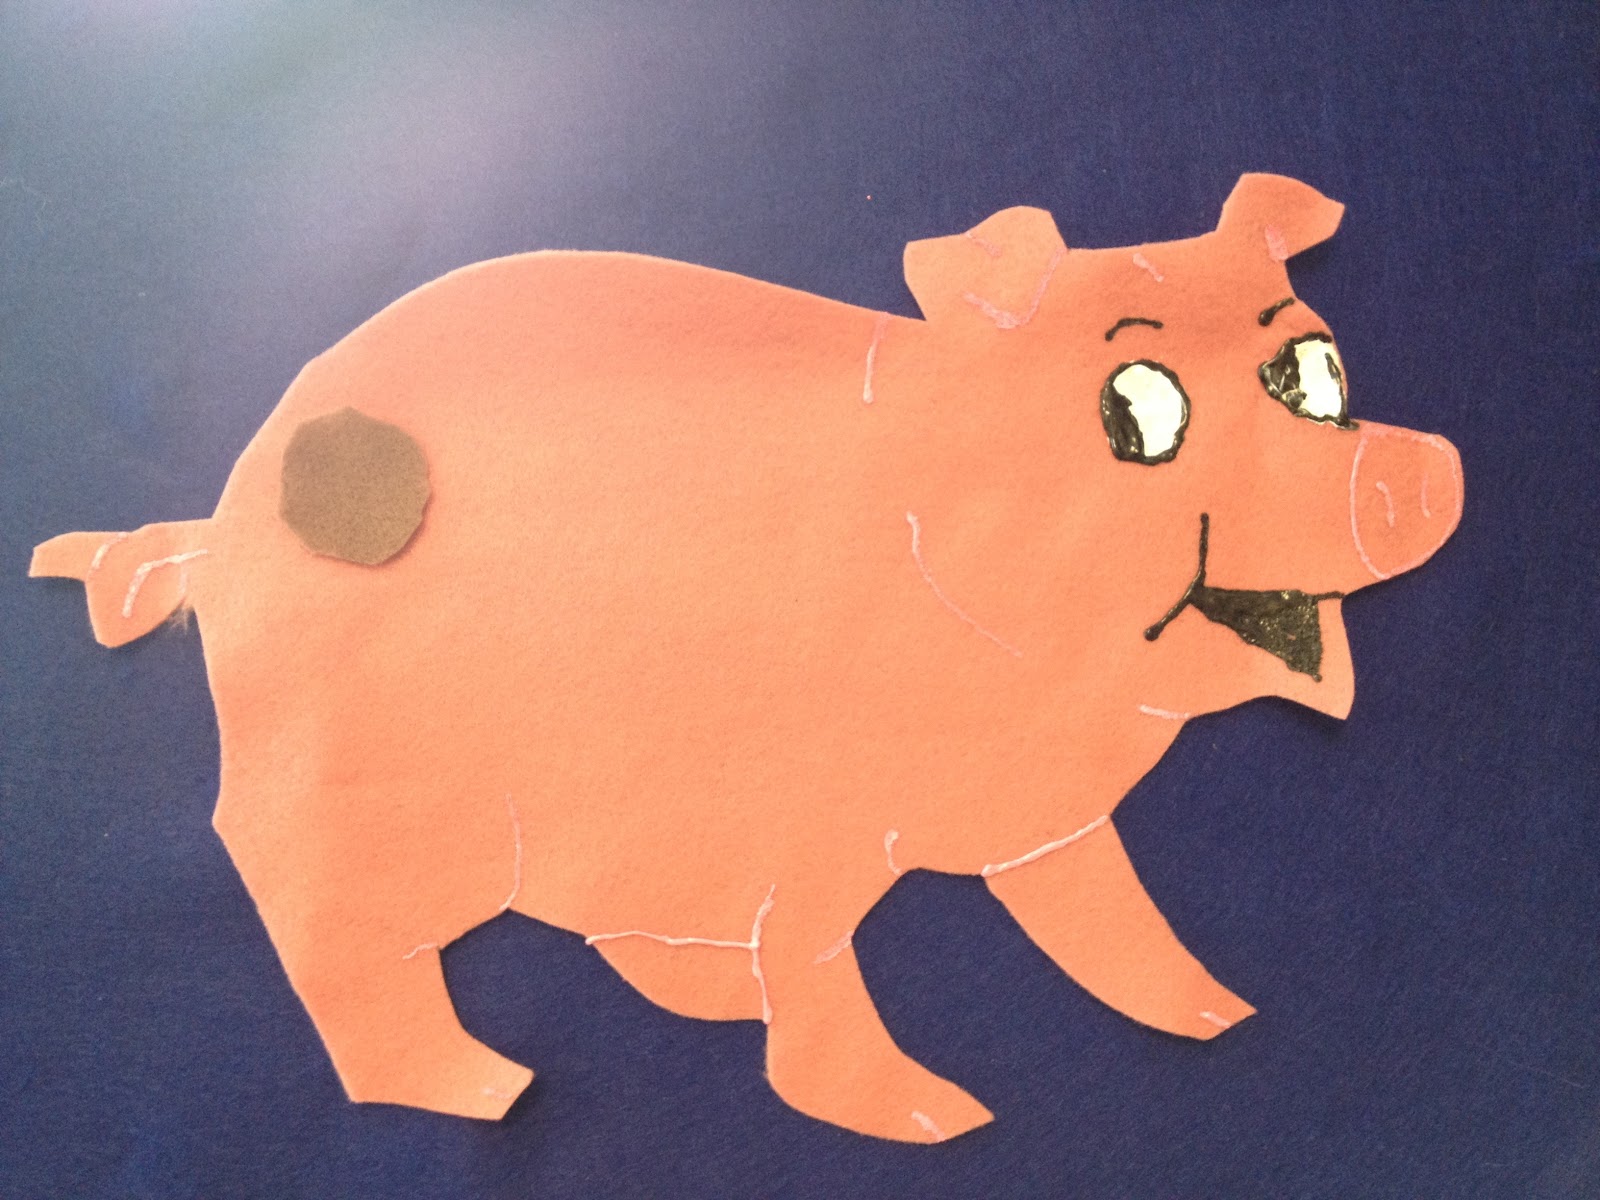
To make your own, I used my Cricut Animal Kingdom cartridge and leftover cardstock that I had at home from scrapbooking.  I set my cutting dial to 2 inches.  You will need 10 of each animal.  (I will admit that I couldn't find a flamingo to cut out.  It is really a pink duck.)  I used Crayola markers to add details, such as the zebra's stripes and the monkey's arms.  Then I laminated the pieces and added velcro to the back.

This is a rhyme where you will have to think about the execution beforehand.  Do you have enough room on your flannelboard for all 100 animals?  When I do it, I either pull out our giant velcro wall from Lakeshore Learning (no longer available for purchase) or say half of the rhyme at a time and clean off the animals in between.  Another possibility is to pass out 1-2 animals to each kid in your group and not worry that there are 10 of each up on the board at the end.  You also have to say the rhyme a little slower than normal or you will have a traffic jam in front of the flannelboard.

This week's Flannel Friday round-up is hosted by Katie at Recipe for Reading.  For more information about Flannel Friday, please check out the Flannel Friday offical blog.

Saturday, June 2, 2012

Stickers in the Library

The problem-I work at a busy suburban library location with one reference desk.  One summer, it seemed that we were constantly in the children's room picking up puppets, books, etc.  While this needed to be done, if we spent all of our time cleaning, it took away from other duties, such as planning for programs and ordering books.

Our solution-we bought a bunch of stickers through Smilemakers when they were on sale.  Then, we hung signs in the children's room that ask kids (and parents) to pick up the puppets and books when they were done playing with them.  We tell them if they clean up, then they should stop by the reference desk to pick out a sticker for helping.

The result-I was pleasantly surprised at how well this worked.  We now have a steady stream of kids (usually ages 2-6 years) coming up to the reference desk to ask for their stickers.  Staff still has to pick up the children's room, but nowhere near as much as that one summer.  As an added bonus, staff get to interact with kids who don't normally come up to the reference desk and the kids learn how to talk to adults and ask for what they want.  It has turned into a good in-house p.r. move.
Related Posts Plugin for WordPress, Blogger...